
The Pose library in Blender is an important feature to improve workflow and speed up the animation production process. This tutorial will quickly present what you need to get up and running with the Asset Browser and the Pose Library storing method so you can share your character’s poses, animations, and more.
Creating a Pose Library
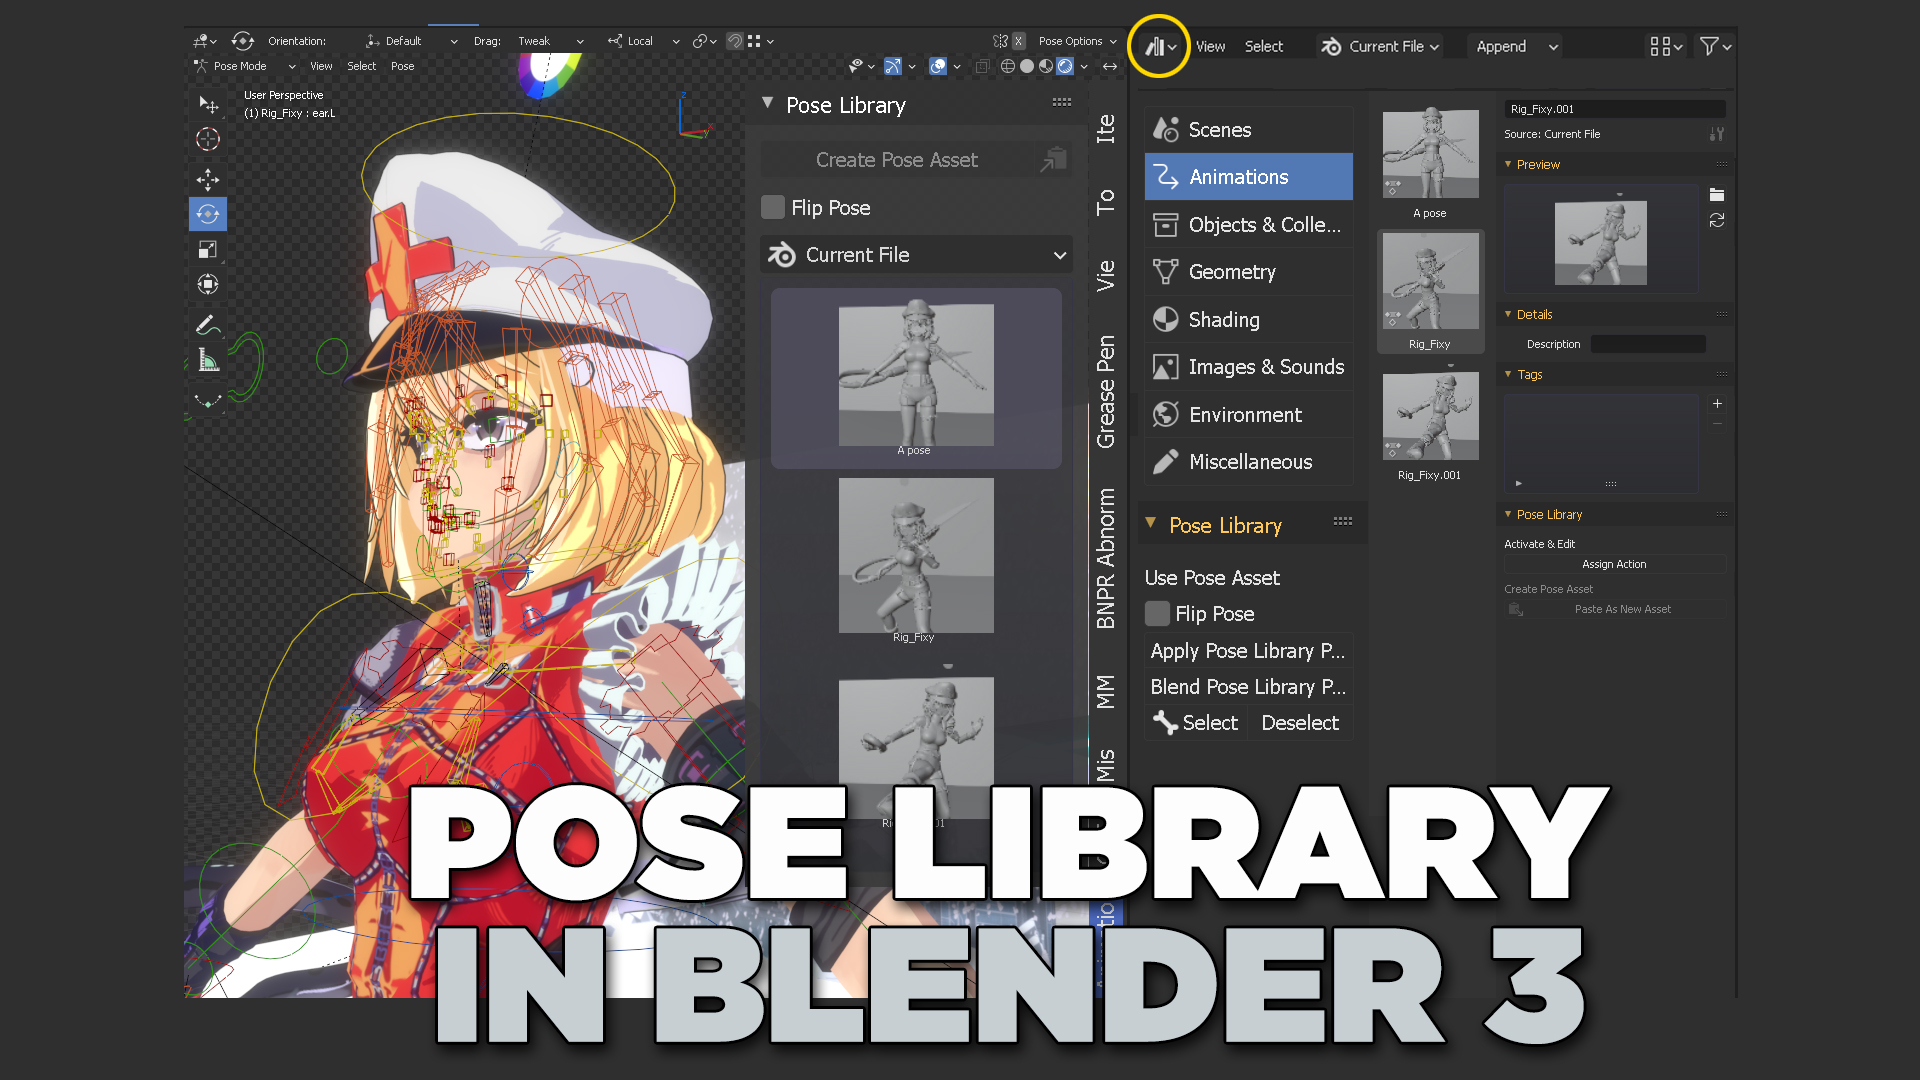
The Pose Library in Blender 3 is a new feature of the Character tools in Blender. The Pose Library helps you create, manipulate, manage, load poses, and set them up for animation. Pose Libraries are stored in the ASSET BROWSER, so we need to understand how it works since the pose library is set in your new Blender file.
You can define an ASSET Library in BLENDER 3 directory by default by goiong into EDIT> Preferences > File Paths> Asset Libraries > and target a directory that you’ll be using for your default Asset Browsing library location.
Then, From the Top menu on your Blender window, you can change the editor window type to “Asset Browser” (Shortcut: Shift+F1)

If you have an already rigged character (we recommend using Rigify – which is a native addon in Blender), Click on ANIMATION from the Asset Browser category. In your 3D viewport, switch to POSE mode, then pose your model as desired.

Now, in your 3d viewport (in pose mode) select the bones you want to store as a pose, press “N”, search for the “Animation Tab” and from the Pose Library title, click “Create pose asset“. This will open a new menu on the lower left side of your 3d viewport so you can name your action to be stored, a.k.a. “your pose name”. This will automatically create a pose library data folder in your .blend file.
In the Asset Browser “N” panel you will find:
- Preview: This will be the thumbnail created with the currently active camera in WORKBENCH render mode only.
- Details: You can add a short description of your pose here
- Tags: You can add words that will help you find this pose if your library grows big. Use your character’s name.
- Pose Library>Asign action: You can select and apply your pose with this button from the Asset Browser.
- Paste as new asset: You can open the original .blend file of the character (if you’re using versioning), select the pose or modify it, save the file, Press copy asset. Close the original .blend file of the character. Open the new .blend file you need to use the pose into, and press “paste as new asset”. This will add the pose you corrected on your original version.
How does Pose Library benefit you in production?
As you may probably know, Fixy (from the Stylized Guilty Gear Shaders training model), was shipped with the Pose Library v.2 in Blender 2.91 – Which basically allows you to select her thumbnail in the pose library when you’re in POSE mode and apply it to the character so she will immediately get into the thumbnail’s preview pose. This is very helpful to speed up your animation or share predefined poses between animator’s workstations in production.
That workflow is about to change in the next Blender version, since I will be updating Fixy to use the default Pose Library 3. You can also use the scene’s camera to set the Library’s thumbnail or create a camera from which you will capture the model. In this screenshot, you see that Fixy is only with default material, but you can change that by assigning colors to the body parts using the WorkBench engine and the properties of the object in VIEWPORT DISPLAY. In the case a single body mesh is used, you will have your character in only 1 color you define. Currently, there’s no option to set a thumbnail using the texture material, but that will probably be updated in the near future. For now, this is a separated Blender Branch that you can download and test from this link>

What does that mean for you?
* Easy posing from presets in the same .blend file or from other .blend file asset library.
* Sharing direct-to-pose files (you can copy file poses from other characters as long as they have the same rig structure and bones)
* Quicker development of pre-defined pose for larger production shows to animate (i.e: you can pose hands quicker if you have a pose library for the character’s hand for many different episodes)
- Flipping poses from one side to the other can now be manipulated using a context property menu (the one on the lower left side of the viewport) to define if the pose will be mixed (mix percentage is shown on the top left corner of the viewport). This used to crash Blender in previous versions but now it’s very solid, and it mixes and flips poses without problems.
- For a full set of features, check this official post from Dr. Sybren, one of the Blender developers, from his official account:
But the one most OUTSTANDING feature that will get into Blender 3 – Pose Library, is the fact that we can finally BROWSE, COPY, USE, DISTRIBUTE file presets for assets.
Blender 3 is going to bring a great change for all of us 3D modelers/animators.
-What other advantages do you see in having an Asset Browser in Blender 3?
2 thoughts on “Pose library in Blender 3: What it is and how to use it”
Can you explain the library of poses from the beginning? like, What is a library of poses, the beginning of what version of blender appears? Then now why sign in to asset browser? Can you explain it to me? I need this explanation for my final assignment. I’ve done some research but it’s still unclear. Thank you for reading this
The page is pretty clear how to set it up, its purpose and there are plenty resources now to check on youtube. I posted this months ahead of anything related to the public release.