
Softimage can be setup to capture wireless midi signals with Android or iOS (ipad) devices. If your have curiosity on how you can expand your animation skills with your smartphone or tablets, keep on reading and thanks for visiting this post. I hope you find it useful and feel free to share it to your social networks with the buttons at the end of this post.
Softimage 2014 – Device capture with wireless MIDI
Softimage has a device capture utility that allows you to control any animation parameter inside the application via Joystick, Midi or Mouse. The strenght in Softimage (SI) is that 95% of the options abroad the software can be animated. So, if you have a rig setup, ICE compound, Shader, Property page (check, divot, slider), Synoptic page, etc.. all of these parameters can be accessed through the device capture setup.
This function was brought along since the days of Softimage 3D. Device capture was primarily oriented to create animation “by hand” -literally-. You can find more on this link about Softimage early years of device capture.#
Now a days we have wireless devices that can help us to setup a connection (bridge) between our PCs and our Androids/Ipads through IP over a wireless network to capture commands and drive parameters with the device capture tool. Word of advice: results in speed response may vary from one device/connection/machine to another.
So what device capture should you use?
We have 3 options: Joystick, Midi, and Mouse. In this tutorial we will be using MIDI device capture. If you need more references on how the other devices work, I´ll be covering the joystick aspect on another post. For the moment, it´s important that you set your mind around what components and elements are to be considered in a typical MIDI device capture inside Softimage. I´d suggest that you ignite F1 and type “Device Capture” in the search box to see some of the basic concepts and parameters covered in detail from Softimage´s help pages.
***** Setting up what we need on the Tablet/Ipad and PC ******
- Smartphone / Tablet
- MidiYoke
- Touch OSC
- Touch OSC Bridge
- Pd-extended (and mix2-recieve.pd layout)
This tutorial covers a setup in Softimage device capture with TouchOSC and ANDROID. If you´d like to create this setup on an IPAD using PC to drive Softimage device capture option, I´ll try to briefly explain how to do it under each step of this tutorial (though I don´t own an Ipad), it should be fairly easy to configure. For organizing files purpose: I suggest you create a specific folderand name it “midi capture” and place all required apps from this tutorial ready to install them from there.
MidiYoke it´s a software that generates midi signals for your PC to recognize virtual midi ports. I installed it to make the PC aware there are midi ports available (MAC users have this preset on Bonjour services, so no need for them to do this part). So download MidiYoke, from the left side menu on the site, install and restart your PC.
Let´s fire up your Google Play icon on your Android device while you wait on your PC. On the seach box type TouchOSC, download the app (It´s a paid app). Alternatively, you can click on this link and set it up from your computer (if you´re previously signed into your Phone/tablet´s main Google account).
To get Touch OSC Bridge (free) we need to go to the developer´s website and scroll down to the bottom of the page on the download section. Find the .zip download for PC (there´s also a MAC download):
http://hexler.net/software/touchosc
You will also notice there´s an OSC Editor, but that will be covered on another post. For now we´ll do all the setups with standard installs.
Let´s download Pd-extended. Pure data is an open source app that will allow us to visualize if the wifi signal from our phone/tablet is reaching our computer. There´s also a template you need to download from OSC Touch site: Scroll down to Pure Data section, find and download mix2-recieve.pd by clicking on this link.
Install OSC Bridge that you downloaded earlier on your PC and run it (execute it). That´s it. This is the “listening to ports” part of the setup on the PC.

Install PD-extended. An Icon will be created on your desktop. Find and open the mix2-recieve.pd template where you downbloaded and double clikc it, it will open PD-extended with this layout open. Leave it open for now, we will come back later.
By now you should have TouchOSC installed on your Android. Let´s configure it to send and receive wifi connections:
Open the app. You´ll see the options (or press menu on your android to get to settings when you´re inside the app). Touch to configure OSC. Your host machine is your computer. Since this tutorial aims to PC, press Windows keyboard key (the ont to the left of your spacebar) and “R”. Will bring “run” window. Type “cmd” -> will bring command line. Type ipconfig/all ->Will bring data about your connection. Find and copy on paper your IPv4 address (should be something like XX.XX.XX.XX ->I. example: 192.168.10.80) This is the IP address we need to type into OSC HOST blank box on the Android device.
On touchOSC menu options, Port (outgoing) is set to 8000 and port (ingoing) is set to 9000 (defaults). In ZeroConf Name box type the name of your device (I.e: Android). You will also see there´s a Local IP Address (192.168.0.239 in my case). That is the IP of your android/tablet device. Press back hardware button on your phone/tablet. You´re back on the main menu of touchOSC.
Let´s configure midi bridge options on the menu inside touchOSC Bridge. On the blank HOST box type the IP adress of your machine (the one you wrote on paper on the previous step). With this you´re done with your wireless device. You should see your HOSTS LIST populated with the name of your PC. If you don’t see your HOST name is because your machine is not transmitting OSC ports. Also, close the TouchOSC application completely in your phone. Then,re-launch it again. This should refresh the Host list and you should see your PC’s NAME.
Make sure to SHUT OFF your antivirus FIRST. Else, you’ll not get wifi connection to your PC.
Touch the back hardware button on your device to go back to the main menu.
***THIS PART IS IMPORTANT, WITHOUT THIS NO CONNECTION WILL ENTER SOFTIMAGE***
Let´s make sure the PC listens to Android over Wifi. Go back to the PD-extended window we left open with the mix2-recieve.pd. If you don´t have it open double click the file on your PC, it will launch pd-extended with the layout automatically open. On that layout window (the one with the funky green, red, blue colors, and sliders look alike) go to MEDIA->Midi Preferences, identify INPUT DEVICE CAPTURE 1: (click on the blank button or the channel button) and select: IN FROM MIDI YOKE 2. Now, under that button locate the Output device 1 channel button, and set it to OUT TO MIDI YOKE 1. Click on Apply and then OK. Close midi preferences window.
Time to test our setup.
On your android device start OSCTouch, Select the LAYOUT option, scroll down the list, find and select “Mix2”, then press DONE. You now have a layout on your Android that resembles mix2-recieved.pd on your PC window. Go ahead and play and twist the buttons and sliders. The signals must reach PC via wifi over your identified hosts IPs.
To touch the other layouts, on your Android – press the top blank buttons and it will switch layouts (my favorite are the X,Y point coordinates axis, watch them move on your pc as you manipulate them on Android and check latency – speed response-).

***** Setting up what we need on Softimage *****
- softimage Rig/Slider
- Device Manager Tool
All right, as you can see the lenghty part was getting our PC and oir Android to “Talk and listen” to each other without an actual physical MIDI device. So It´s now time to configure Softimage. For that you need to have “something” to drive, it could be a sphere, cube or a facial rig like my case.
// About my rig: I´m using a very old model character. It´s got blend shapes that are connected to a curve–based panel on the scene, so I can drag it around and fire off shapes on the character, based on the “joystick” position (they call it joysticks, I call them controllers).
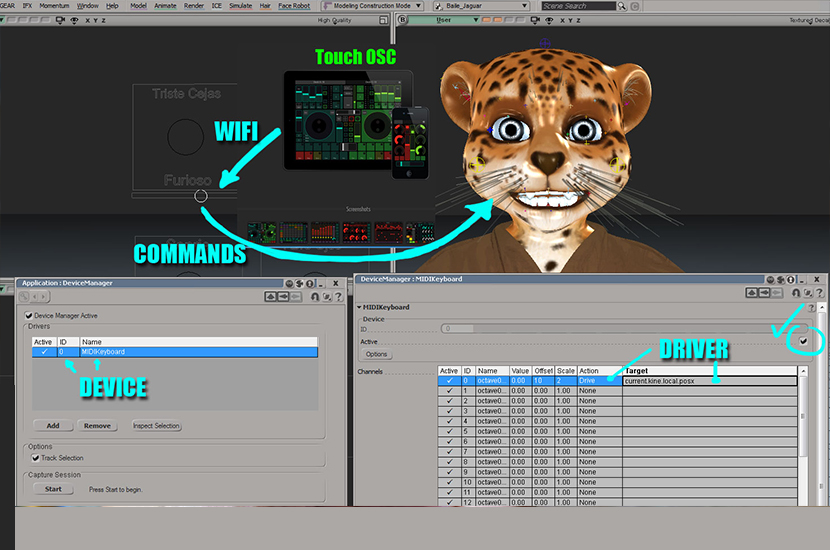
I select the controller (you can create and select a sphere in your scene if you´re doing it that way), and go to ANIMATE ->TOOLS->DEVICES->MANAGE DEVICE DRIVERS. With this a ppg will open. Press the ADD button, and a list will pop up. Select a device driver: MIDI.
Another ppg opens showing you 127 channels on the Midi device which you can pilot at will from your TouchOSC app. Look at the channels list and there are some fields that are insteresting to us: ID, OFFSET, SCALE, ACTION and TARGET. You can also change the NAME to identify your object-driven parameters correctly.
Type and modify -> Value: 10. Offset: 10, Scale: 2, Action: Drive, Target: current.kine.local.posx
So if all is ready, click on ACTIVE check on the same PPG on the upper right hand and test your android device TouchOSC layout slider driving the ID 0 (zero) with that command.
Your object (sphere) will react to it´s current position X according to your slider. Latency could be a factor when doing this, your PC could respond extremely fast if you´re the only one on the WIFI net, or it will delay a couple of miliseconds if you´re in a crowded WIFI network. Keep this in mind when capturing REAL TIME signals on Softimage.

***** CONCLUSIONS *****
Coding the parameters inside Softimage it´s beyond the scope of this tutorial, all though there´s a lot of reference on the SDK. But if you further need to explore certain parameters on the fly, press CTRL+SHIFT+4 (View ->Scripting ->SDK explorer), there you can navigate through the entire hierarchy and commands that could be driven on your object. Conquering the code for softimage has been of great help recognizing how to syntax most things concerning commands, I recommend it as well. SI-Community it´s another website that specifically has a forum categories designed to help each other with code.
I would like to deeply thank IKER de los MOZOS for sharing this amazing conference on setting up this same setup with 3ds Max and Ipad. It inspired me to find a way to connect Softimage and Android for the same purposes.
You can find all technical references necesarry for this tutorial, on this post#.
I hope you really liked this tutorial. Below there´s another USE for using external controllers (joypad) to drive parameters inside softimage using Kai-Wolters Device Capture drivers. Great material if you´d like to keep experimenting with this function in Softimage:
Softimage Device Capture Tutorial p1 from Active Motion Pictures on Vimeo.
Softimage Device Capture Tutorial p2 from Active Motion Pictures on Vimeo.
Share it to your socials. Thanks!