
This is a “rescued” video tips I was doing when doing the base mesh before sculpting .
My character was a funny toon tooth.
I recommend you copy/paste this on a text editor to read all the steps while you go along the video.
In case you´re interested in watching a totally new video with the same concepts applied but in a very finished video, please give a 100 likes to this one. Don´t try screencast (free) screen capture software from AD. Don´t.
CREATING THE BASE MESH
Key shortcuts:
MERGE – ALT+M
FILL FACES – F (Poly tools addon must be active on your user preferences addons: CTRL+ALT+U / Addons)
Step 1: Create a Plane (Shift+A)>plane. Enter Edit mode (ctrl+tab). Press 1 (vertex selection filter).
Step 2: Select all vertices on the plane(A), then ALT+M (Merge vertex points).
Step 3: Add Mirror modifier, Add Skin Modifier, Add Subdivision Surface modifier (in that order) leave everything at defaults.
—-Skin modifier commands —-
Step 4: Press E (Extrude) and start shaping your character.
Step 5: Position your vertex where you want your shape to be extruded press E. If you need to scale, press CTRL+A and drag to scale. If you need to insert a point in-between 2 vertex: Select both vertex, press W (select SUBDIVIDE) and an extra vertex will be created in between the selected vertex.
——
Step 6: Create the arms following the same method using a new object. Later (on OBJECT MODE) use Boolean Tool: UNION. That way your objects (body and arms) become one mesh.
———
Step 7: Switch to sculpting mode (TAB and 8). Here you can use many brushes and masking options to give more shape to your character.
Use “M” to paint MASK your zones. Use ALT+M to clear mask. Use CTRL+I to invert the masking zone. Use SHIFT+5 to always select your sculpt tool. Press “Shift” with any sculpt tool to “smooth” your mesh on rough zones. Press “CTRL” to invert your current brush push/pull option (if it´s inflate, it will de-flate). If you need to access your brushes quicker, press the SPACEBAR and you will get access to a special menu.
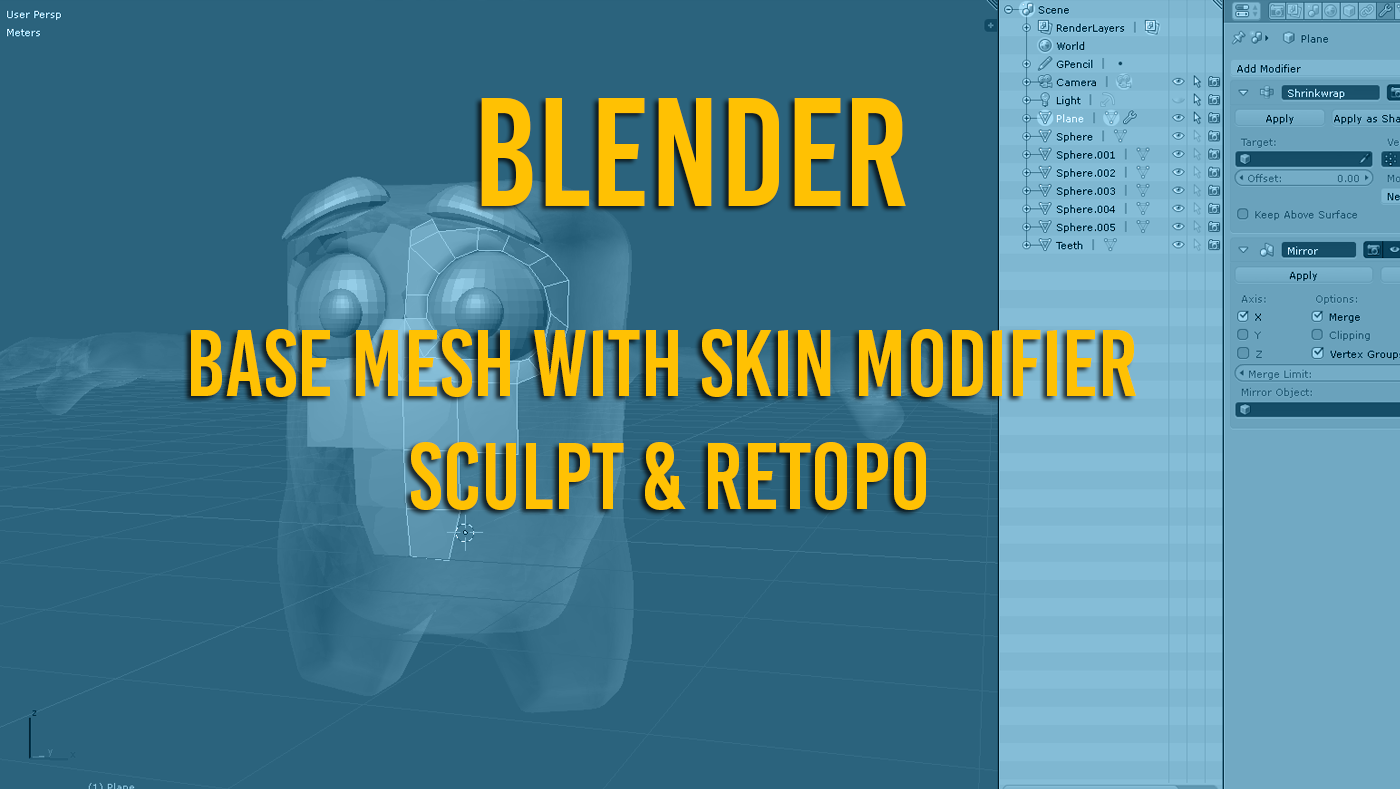
There are several awesome methods I apply here as part of a nifty workflow to create base mesh and later retopo-ing a character. The skin modifier is amazing.
RETOPO
Step 8: Move your high poly mesh to another layer. Select your object, press “M” to select the second layer. On the first layer (it should be blank now) create a plane (Shift+A – Plane), go to edit mode (tab – edit mode). Press 1 (vertex selection filter). Press Ctrl+A (select all). Then do ALT+M (merge vertex), select “At center”.
Step 9: You now have a vertex to start retopo. Activate your snap tool (magnet icon) and select FACES (to snap to).
Then, go to your modifiers, and select “shrink wrap”. This will make sure that whatever you create over the surface of your character will “stick” to it´s surface.
Once you have all that setup, position your vertex over any zone of your character, and start extruding (press E) over continuous parts as shown in the video. If you need to extrude edges, press 2, select edge, press E, move your mouse to desired position. If you need to merge vertex, press ALT+M (merge at centers).
Seems a little daunting but as you can clearly see on this video, the method is fascinating accurate, and you can even pose your character like in Zbrush or 3Dcoat. But that I will show in a complete video if this video gets a 100 likes.
Thanks. Share if you´re interested.
While you´re at it, try your knowledge on this tutorial:
[h5p id=”1″]